Android Studio tutorial will discuss about the graphic user interface or who are familiar with the term GUI on android. Once we learn the types of layouts on android as well as how to design the layout with the help of tool DroidDraw, then it is time we learn the objects contained in the android. Understanding of the graphic user interface itself is the objects that will fill the screen with the display of each function. I will not discuss all objects contained in the android, because it very much but that will be discussed are the objects that are often used in the manufacture of mobile android based applications, including:
- TextView
- EditText
- Button
- RadioButton
- CheckBox
- Button image
- ListView
That the objects of the graphic user interface which is later in my discussion will be divided into several sections, which will be contained in any discussion following examples display the results of each object.
TextView
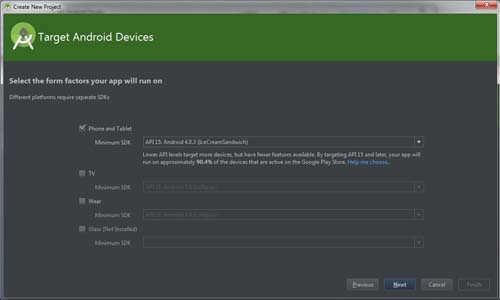
TextView is the object used to display text on the screen, there are two examples of source code that you need to learn about TextView object that is TextViewActivity.java and activity_text_view.xml. android editor please you open your studio and then create a new project, on the part of the contents of the Application name you TextView, then click next on the minimum SDK you fill with the image below if you already click next, and then you select Blank Activity if already click next on Activity section of your name TextViewActivity contents as shown below after you click finish.
Type the following source code in the activity_text_view.xml
<RelativeLayout
xmlns:android="http://schemas.android.com/apk/res/android"
xmlns:tools="http://schemas.android.com/tools"
android:layout_width="match_parent"
android:layout_height="match_parent">
<TextView
android:id="@+id/textView1"
android:clickable="true"
android:textSize="20dp"
android:textColor="#0000FF"
android:gravity="center"
android:lineSpacingMultiplier="1.5"
android:layout_width="wrap_content"
android:layout_height="wrap_content"
android:layout_alignParentTop="true"
android:layout_centerHorizontal="true"
android:layout_marginTop="50dp"
android:text="Static TextView"/>
<TextView
android:id="@+id/textView2"
android:clickable="true"
android:textSize="20dp"
android:textColor="#FF9900"
android:gravity="center"
android:lineSpacingMultiplier="1.5"
android:layout_width="wrap_content"
android:layout_height="wrap_content"
android:layout_alignParentTop="true"
android:layout_centerHorizontal="true"
android:layout_marginTop="120dp"
android:text="Java"/>
<TextView
android:id="@+id/textView3"
android:clickable="true"
android:textSize="20dp"
android:textColor="#FF0000"
android:gravity="center"
android:lineSpacingMultiplier="1.5"
android:layout_width="wrap_content"
android:layout_height="wrap_content"
android:layout_alignParentTop="true"
android:layout_centerHorizontal="true"
android:layout_marginTop="190dp"
android:text="Android"/>
</RelativeLayout>
package com.dsoccerupdate.textview;
import android.os.Bundle;
import android.app.Activity;
import android.view.Menu;
import android.view.View;
import android.widget.TextView;
import android.widget.Toast;

public class TextViewActivity extends Activity {
    TextView tv1, tv2, tv3;
    @Override
    protected void onCreate(Bundle savedInstanceStace)
    {
        super.onCreate(savedInstanceStace);
        setContentView(R.layout.activity_text_view);
        tv1 = (TextView) findViewById(R.id.textView1);
        tv2 = (TextView) findViewById(R.id.textView2);
        tv3 = (TextView) findViewById(R.id.textView3);

        tv1.setOnClickListener(new View.OnClickListener() {
            public void onClick(View v) {
                Toast.makeText(getBaseContext(), "Static TextView Clicked",Toast.LENGTH_SHORT).show();
            }
        });
        tv2.setOnLongClickListener(new View.OnLongClickListener() {
            public boolean onLongClick(View v) {
                Toast.makeText(getBaseContext(), "Java Long Clicked", Toast.LENGTH_LONG).show();
                return false;
            }
        });
        tv3.setOnClickListener(new View.OnClickListener() {
            public void onClick(View v) {
                Toast.makeText(getBaseContext(), "Android Clicke", Toast.LENGTH_SHORT).show();
            }
        });
        tv3.setOnLongClickListener(new View.OnLongClickListener() {
            public boolean onLongClick(View v) {
                Toast.makeText(getBaseContext(), "Android Long Clicked", Toast.LENGTH_LONG).show()
                return true;
            }
        });
    }
}
EditTextEditText is a component that functions to input handwriting on the screen, which through this text editing component you can write all kinds of commands which are then processed by an application. In order to more clearly you learn this text editing component I give you an example, open your studio android editor, and then create a new project with the name EditText. Then create two programs with names EditTextActivity.java and activity_edit_text.xml.Source code activity_edit_text.xml<?xml version="1.0" encoding="utf-8"?> <LinearLayoutxmlns:android="http://schemas.android.com/apk/res/android" android:layout_width="fill_parent" android:layout_height="fill_parent" android:orientation="vertical" > <EditText android:layout_width="match_parent" android:layout_height="wrap_content" android:id="@+id/editText"> <requestFocus /> </EditText> </LinearLayout>
Source code EditTextActivity.java
package com.dsoccerupdate.edittext;

import android.app.Activity;
import android.os.Bundle;
import android.view.KeyEvent;
import android.view.View;
import android.view.View.OnKeyListener;
import android.widget.EditText;
import android.widget.Toast;
public class EditTextActivity extends Activity {
    private EditText editText;
    @Override
    public void onCreate(Bundle savedInstanceState) {
        super.onCreate(savedInstanceState);
        setContentView(R.layout.activity_edit_text);
        addKeyListener();
    }
    public void addKeyListener() {
        editText = (EditText) findViewById(R.id.editText);
        editText.setOnKeyListener(new OnKeyListener() {
            @Override
            public boolean onKey(View v, int keyCode, KeyEvent event) {
                if ((event.getAction() == KeyEvent.ACTION_DOWN)
                        && (keyCode == KeyEvent.KEYCODE_ENTER)) {
                    Toast.makeText(EditTextActivity.this,
                            editText.getText(), Toast.LENGTH_LONG).show();
                    return true;
                } else if ((event.getAction() == KeyEvent.ACTION_DOWN)
                        && (keyCode == KeyEvent.KEYCODE_9)) {
                    Toast.makeText(EditTextActivity.this,
                            "ketik angka 9 !", Toast.LENGTH_LONG).show();
                    return true;
                }
                return false;
            }
        });
    }
}
If the source code is executed, the results are as follows.
Button
Button is used as a key component to execute a command program contained in the button itself, for example, you create a new project with the name on the button where there are two program files with names activity_button.xml and ButtonActivity.java.
Source code activity_button.xml
<RelativeLayout

    xmlns:android="http://schemas.android.com/apk/res/android"
    android:layout_width="fill_parent"
    android:layout_height="fill_parent">

    <TextView
        android:id="@+id/textView1"
        android:text="Learn Android Button"
        android:layout_width="wrap_content"
        android:layout_height="wrap_content" />
    <ToggleButton
        android:id="@+id/toggleButton"
        android:layout_width="wrap_content"
        android:layout_height="wrap_content"
        android:layout_alignParentLeft="true"
        android:layout_alignRight="@+id/textView1"
        android:layout_below="@+id/textView1"
        android:onClick="onToggle"
        android:text="Tombol Toggle"/>
    <Button
        android:id="@+id/button1"
        android:layout_width="match_parent"
        android:layout_height="wrap_content"
        android:layout_alignParentLeft="true"
        android:layout_below="@+id/toggleButton"
        android:onClick="onClick"
        android:text="Tombol 1"/>
    <Button
        android:id="@+id/button2"
        android:layout_width="match_parent"
        android:layout_height="wrap_content"
        android:layout_below="@+id/button1"
        android:onClick="onClick"
        android:text="Tombol 2"/>
    <Button
        android:id="@+id/button3"
        android:layout_width="match_parent"
        android:layout_height="wrap_content"
        android:layout_below="@+id/button2"
        android:onClick="onClick"
        android:text="Tombol 3"/>
    <Button
        android:id="@+id/button4"
        android:layout_width="match_parent"
        android:layout_height="wrap_content"
        android:layout_below="@+id/button3"
        android:onClick="onClick"
        android:text="Tombol 4"/>
    <Button
        android:id="@+id/button5"
        android:layout_width="match_parent"
        android:layout_height="wrap_content"
        android:layout_below="@+id/button4"
        android:onClick="onClick"
        android:text="Tombol 5"/>

</RelativeLayout>
Source code ButtonActivity.java
package com.dsoccerupdate.button;

import android.os.Bundle;
import android.app.Activity;
import android.view.View;
import android.view.View.OnClickListener;
import android.widget.Button;
import android.widget.Toast;
import android.widget.ToggleButton;
public class ButtonActivity extends Activity {
    @Override
    protected void onCreate(Bundle savedInstanceState) {
        super.onCreate(savedInstanceState);
        setContentView(R.layout.activity_button);
        Button btn = (Button) findViewById(R.id.button3);
        btn.setOnClickListener(new View.OnClickListener() {
            public void onClick(View view) {
                Toast.makeText(getBaseContext(), "Tombol 3 diklik langsung",
                        Toast.LENGTH_SHORT).show();
            }
        });

        Button btn4 = (Button) findViewById(R.id.button4);
        btn4.setOnClickListener(tombolListener);
    }
    private OnClickListener tombolListener = new OnClickListener() {
        public void onClick(View view)
        {
            Toast.makeText(getBaseContext(),
                    ((Button) view).getText() + "diklik Listener",
                    Toast.LENGTH_LONG).show();
        }
    };
    public void onClick(View view) {
        Button btn = (Button) view;
        Toast.makeText(this, btn.getText() + "di klik",
                Toast.LENGTH_SHORT).show();
    }
    public void onToggle(View view) {
        ToggleButton btn = (ToggleButton) view;
        Toast.makeText(this, "Kondisi tombol toggle : " + btn.isChecked(),
                Toast.LENGTH_SHORT).show();
    }
}
So
a discussion of the graphic user interface on one part android which in this
article we have discussed the following three components for example from
TextView, EditText and Button. Hopefully this article can provide benefits; in
the next article I will discuss the components RadioButton, CheckBox, Button
image and ListView.


0 comments:
Post a Comment